Since water expands when it freezes, if there's water sitting in a pipe or a spigot when the temperature drops below freezing, that water turns to ice, the ice pushes outward, and something ends up cracking or splitting. Sometimes the split is right at the spigot and you notice it the next time you turn the water on. Sometimes the split is six feet back inside the wall of your house, and you don't notice until it thaws and starts flooding a room.
If you've never winterized your outdoor spigots before, then you could be at risk. Here are 3 steps to protecting your pipes from disaster when it freezes.
Step 1: Disconnect and drain every hose
Walk the entire perimeter of your house and unscrew every hose from every outdoor faucet. Don't skip the one behind the shed, the one on the side of the garage you never use, or the soaker hose running through the garden bed. If it's attached to a spigot, it comes off.
Once the hoses are off, drain them. The easiest way is to stretch each one out downhill across the yard or driveway and let gravity do the work. Then coil them up and store them in the garage or a shed, not laying on the ground where they'll freeze solid and crack.
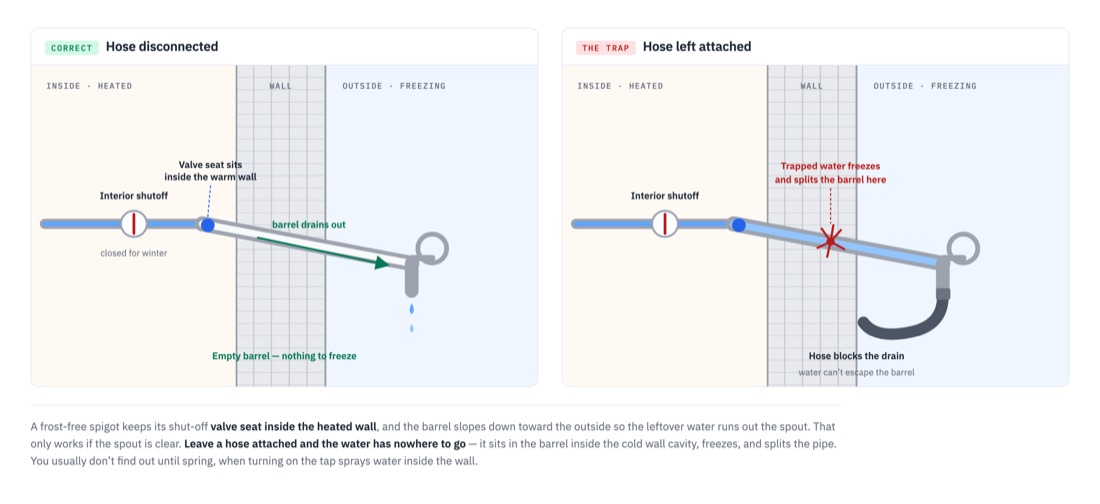
This step matters more than people realize, and here's why. A lot of newer homes have what's called a frost-free sillcock — an outdoor faucet designed so the actual shut-off valve sits a foot or so back inside the warm part of the house, with a long stem running out to the handle. When you turn the handle off, the water in the exposed portion is supposed to drain back out the spout. That only works if nothing is screwed onto the spout. Leave a hose attached and the water can't drain, it sits in the stem, it freezes, and the frost-free sillcock bursts behind the wall just like a regular one would. Assuming you're safe because you have frost-free spigots is how a lot of people learn this lesson the hard way.
Step 2: Shut off the interior valve, if you have one
Go into your basement, crawlspace, or utility room and look at the pipes running to each outdoor spigot. In a lot of houses there's a small shut-off valve on each of those lines — usually a little lever or a round handle a few feet back from the exterior wall. If you have them, turn each one off.
Not every house has these. Older homes often don't, and some newer homes with frost-free sillcocks skip them because the design is supposed to handle it. If you can't find one after a reasonable look, don't tear the house apart — just make sure Step 1 and Step 3 are done properly.
Step 3: Open the outdoor spigot and leave it open
After the hose is off and the interior valve (if you have one) is shut, go back outside and open the outdoor faucet. Water will dribble out for a few seconds and then stop. Leave the handle in the open position for the winter.
The point is to give any water still sitting in the line somewhere to go as it drains or as it expands. A closed spigot with trapped water has nowhere to relieve pressure when that water freezes. An open one does.
Foam faucet covers are cheap insurance
If your spigots aren't frost-free, or if you're in an area that gets genuinely cold and want a little extra margin, pick up a few foam faucet covers at any hardware store. They're a couple of bucks each, they slip right over the spigot, and they have a little loop of wire or string that hooks onto the handle to hold them in place. They don't replace doing the three steps above — they're in addition to them — but they help keep the spigot itself from getting hit directly by freezing air.
Sprinkler systems are a different job
If you have an in-ground sprinkler system, that's not what this post is about. Sprinkler lines have to be cleared with compressed air — the blow-out — and it takes a real compressor, not the little one you use for bike tires. Most homeowners hire this out. It usually runs $75 to $150 depending on the size of the system, and it's worth every penny compared to replacing cracked valves and underground lines in the spring.
Here in the Pacific Northwest we usually get our first real freeze sometime in November. Wherever you are, the rule is the same: do this before the first hard freeze, not during it. Once the forecast is already showing overnight lows in the 20s, you're racing the weather.
Leave a comment