Here are the basic steps to personalize and secure your wireless home network. You don’t have to be technical to do this.
Having recently moved into an apartment while we wait for our new house to be ready, I had to set up my wireless home network with a Linksys router hooked up to Comcast XFinity.
Here are the basic steps you’ll want to take to personalize and secure your wireless home network. You don’t have to be technical to do this – just follow these easy steps and make sure your settings are the same as the screenshots below.
1. Connect to your wireless network
Plug your wireless router (aka. wifi access point) into your Comcast, Frontier or DirecTV modem and look for a network named “linksys” in your computer’s wireless networking settings.
On a Mac, just click the wireless icon on the top right of your screen to see a list of available networks.
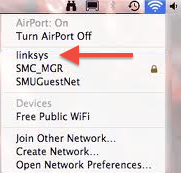
On a Windows PC, you should see a wireless icon on the lower right of your screen, in the taskbar.
Select this network and it should connect without asking you for a password, because we haven’t set up a password yet.
2. Log in as the Administrator
Open a web browser and type in http://192.168.1.1 to access the admin console for your Linksys router.
You’ll be prompted for a username and password. Use admin in both fields, which is the default username and password for all Linksys routers.
3. Give your network a name
Click the Wireless tab in your linksys admin console and enter a name for your wireless network in the Network Name (SSID) field. I’m a Lord of the Rings fan, and a total geek, so I called mine gandalf 🙂
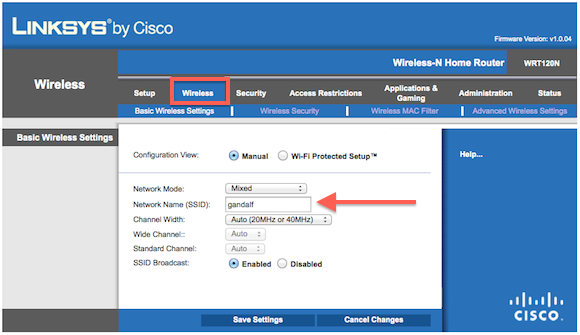
Make sure you click “Save Settings” when you’re done.
Since you changed the name of your network, you’ll need to repeat the first two steps (connect to your newly named network, and log back in as the Administrator).
4. Turn on wireless security
To make sure that someone else doesn’t use your wireless network for free, you’ll want to enable security for your wireless network. Click the Wireless tab, and then click “Wireless Security”.
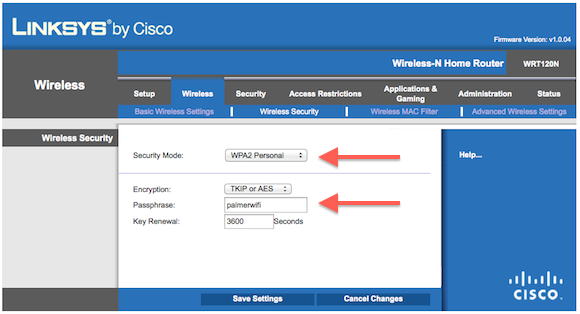
Choose WPA2 Personal as the security type, and enter a password for your network in the Passphrase field (palmerwifi in my case).
Save your settings, and repeat steps 1 and 2 again. I know it’s a bit of a pain to keep doing this… but it’ll be worth it when you’re finished.
Also, this time when you try to connect to your wireless network, you’ll be prompted to enter the password that you just provided.
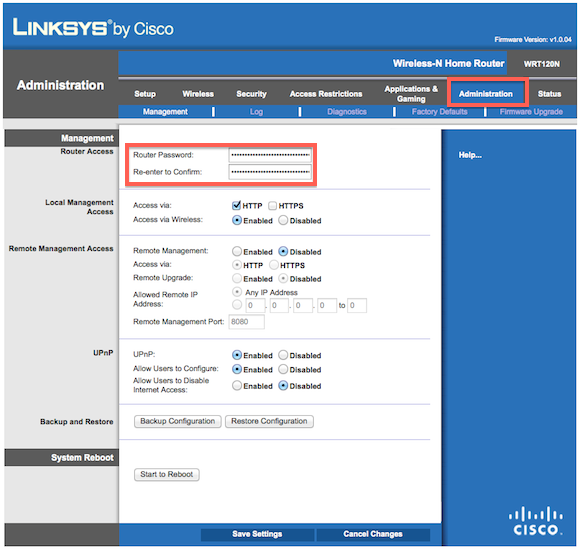
5. Set a private admin password
The last step is to change your admin password, so that no one connected to your wireless network can wipe out the changes you’ve made in the previous steps.
Click the Administrator tab and enter a router password.
Save your settings and you’ll have finished personalizing and securing your wireless home network.