Is there a way to export contacts from LinkedIn to Excel?
I have hundreds of contacts in LinkedIn. Is there a way these Linkedin contacts can be exported to an excel spreadsheet?
Answers and advice from a geek who knows stuff
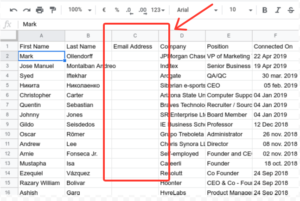
I have hundreds of contacts in LinkedIn. Is there a way these Linkedin contacts can be exported to an excel spreadsheet?

This handy and inexpensive tool will extend the life of your Christmas lights and has fixed my lights year after year.
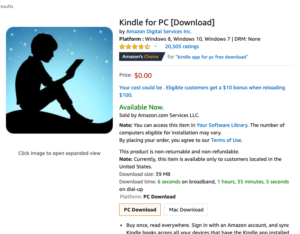
Question: I have a lot of books on my Kindle, but sometimes I’d like to read them on my laptop instead of on my Kindle. Is there a way to do that?
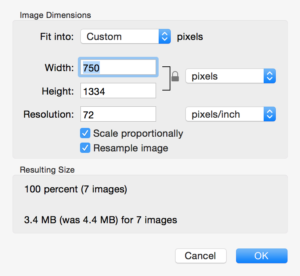
If you have more than a couple images that you need to resize, you know how time consuming it can be to open each image and change the size settings one by one.
How to convert your analog recordings from Hi-8 or VHS into digital movies and save them to DVD.
Hello Ricky, I hope that you can help me! I have lost maybe two thirds of my precious family pictures. Can these be retrieved?
Setting up your own mail merge template using Word and Excel is fairly easy and you can save you a lot of money at the print shop by doing it yourself.
Question: I need to send faxes but I don’t have a fax machine. Is there a way for me to send and receive faxes using email?
Answer: Yes, you can send and receive faxes without owning a fax machine, just by using software that converts your email program into a fax service. It’s called email faxing, and here’s how it works:
You install software on your computer that links your email account with your fax number through an email faxing service. When you want to send a fax, you instead send an email and the service converts it to a fax message and delivers it immediately. Simply attach the document you’d like to fax to an email. Input the number of the fax machine to which you’d like to send the fax, and the software handles the rest. You can also send your faxes to multiple recipients online, so you don’t have to repeat the procedure again and again (with a new cover letter each time).
I use my leather laptop bag every day to bring my laptop to work, and every day I put my phone charging cord in that bag nice and tidy… yet somehow it gets all tangled up by the time I arrive to work.
You can almost always recover files from your memory card, even if your system is saying the card is corrupted. Here’s how…
Question: I saw your article on how to copy music to an ipod, but is it possible to point the ipod to an external portable drive, so that it finds music files there instead of from the main hard drive?
Most Blackberry devices comes with a standard 3.5-inch headphone jack that let you listen to music from the built-in mp3 player. But you can also listen to music using a wireless bluetooth headset. Here’s a step-by-step guide that will show you how to set up bluetooth on your Blackberry so you can listen to music using a wireless bluetooth headset.
Question: Does anyone know how to clean out the dust from underneath a Samsung Access cell phone? It seems to be coming in from the lower left side of the phone. Thanks.
Answer: (this question is waiting for an answer. If you know the answer, please feel free to use the comment form below and be sure to leave your name and a link to your website, so I can give you credit for your answer)
Whether you’re a PC, Mac, or Linux user there is one common document format that’s viewable across multiple operating systems – the Portable Document Format… commonly known as PDF and viewable with Adobe’s free Acrobat Reader.
Have you ever visited a website that showed you the same exact ad on every single page you visited? You quickly put it in your mental “IGNORE THIS” list, which made it basically invisible.
How to transfer ringtones and pictures between phones using Bluetooth.